
Looking to create a home surveillance system, without having to fork out the big bucks?
So you want to have a little surveillance system in your house, but you’re not the type to blindly spend a few grand on something that you always need to call someone when it needs looking at. We all know that if you want something done right, (‘insert Texas accent’) “Gosh Darnit, You gotta do it yerself.”
Well luckily for you, with the advancement of microcontrollers and a little bit of know-how, we’ll get that fixed up for ya.
First things first, let’s take a look at what you’re gonna need:
- Raspberry Pi 4 Model B (can also be Pi 3 but wont have HDMI, also if you use a Pi Zero, just make sure you have a wifi dongle for it as well.).
- Raspberry Pi Cam (V1 or V2 is fine). You could even use a USB webcam.
- Micro-SD card and the SD housing.
- Raspberry Pi Power Supply
- SD Card Reader
- Ethernet Cable / Wifi Dongle
I was able to get all the components I needed at: https://www.communica.co.za/
Let’s get Cracking.
So first of all, you’re going to need to load an Operating System to your Pi. You will do this by loading it onto your SD card which we will then insert into our Pi.
The OS we will be using for this project is MotionEyeOS. It is an open source project on GitHub, with a huge fan base and is constantly updated and well maintained.
Simply download the ZIP from this GitHub url: https://github.com/ccrisan/motioneyeos
From here we will flash it onto our SD card using a free tool called “balenaEtcher” which you can download from here: https://www.balena.io/etcher/
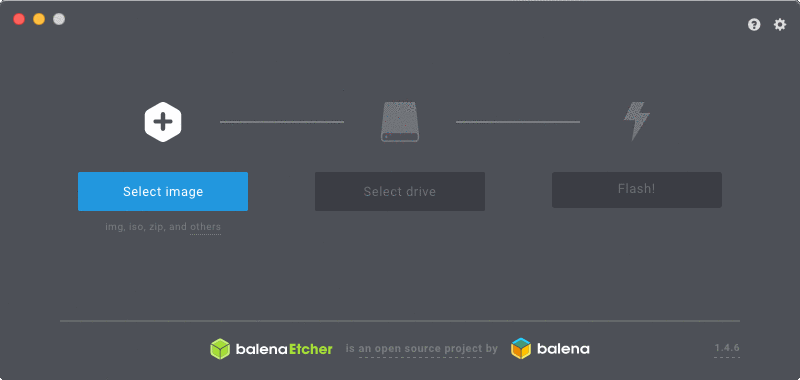
So here you will select your image, which is wherever you downloaded motionEyeOS to. Then usually “select drive” will already have selected your SD card reader with the SD card, if not then you can simply use finder or file explorer and select it. Then click Flash! And it will begin flashing the OS onto your SD card, this may take a few minutes.
Once that has completed, you may safely eject your SD card and remove it from your computer.
Now let’s go back to your Pi. Take your Pi camera and insert the ribbon connector into the matching clip on the board. If you are using a USB webcam then simply insert it to your usb port. posologia ivermectina gotas

Now remove the microSD from the SD card and insert it the slot on the underside of your Pi. durvet ivermectin human dosage Then you may proceed to connect your power supply, ethernet cable connected to your router.
Once your power supply is connected, you should see a green blinking LED.
**NOW TIME TO SEE YOUR HARD WORK PAY OFF.**
Download Angry IP Scanner here: https://angryip.org/download
We will use Angry IP to scan for your Pi’s remote IP address, which we will connect to in order to see your surveillance footage.

Once you have found your Pi’s IP address, type it into your browser and you should be directed to a screen that looks like this:

In order to login for the first time, use the following credentials:
- Username: admin
- Password: leave blank

Once you have logged in you should be able to see the feed from your camera. You can also configure your surveillance system as you see fit.
For help there, please check out: https://web.bluebeansoftware.com/configuring-your-raspberry-pi-surveillance-system/
